A big thank you and shout out to the folks at BugGuide.net for their help in identifying so many of the little beasties that I see in my yard and gardens!
Last week was a perfect case in point. I saw a large black bee nectaring on swamp milkweed from my kitchen window and I grabbed the camera to get a few photographs. This insect was new to me, but it reminded me of a bee that had been recently talked about and shared in a Facebook group about pollinators. So I looked up the two-spotted longhorned bee, the species in question, and it looked good...but maybe just a little different from what I was seeing.
The abdominal spots were smaller in my individual than in many of the photos of the two-spotted longhorned bee in BugGuide and the long hairs on the legs of my individual were dark, not light, but otherwise it looked like a reasonably good match. There are really a limited number of large black bees it could have been, excluding bumble bees, which this wasn't. So I tentatively identified my photos and submitted them as an ID request.
Within a day, Dr. John Ascher had identified my specimen as a southern carpenter bee (Xylocopa micans), a species that I was totally unfamiliar with and had never even considered. I actually thought that the eastern carpenter bee (Xylocopa virginica) was the only large carpenter bee in our area so I hadn't thought to look more closely at carpenter bees.
According to the brief research I did, there is not much known about the life cycle of the southern carpenter bee. A fact sheet from the University of Florida reports that the only nests that have been reported were in small branches of Ligustrum (1958) and red maple (1975), about 1-1.5 m above the ground. Apparently this species is NOT an economic problem, as the eastern carpenter bee can be.
Was this an earth shattering identification? No. But the only other way I know to really identify many of the insects I photograph, including this one, would be to catch them and kill them, then look at them under magnification, using keys. While that is certainly the classic way to deal with insect identification, I am gardening on less than 0.4 acre in the middle of a suburban development where new assaults seem to occur daily against the wildlife present. Trees and shrubs are cut down and replaced with chemical-soaked lawn. What flowers there are come from the big box stores which, around here, means they are full of neonic pesticides. There are far more non-native plants than natives in everyone's yards, providing little food for native insects and other animals. Often I only see one individual of a species in my yard - and, if I collected it to identify it, I might have just kept that species from keeping a toehold around here. For example, I have not, to my knowledge, seen a southern carpenter bee here in the 3 years we've lived here - and I haven't seen another one since I saw this individual a week ago.
Why do I find it so important to know what the various insects are in my yard and gardens? I ask myself that question on a pretty regular basis, wondering if I'm wasting everyone's time, including my own. Then I identify a new species and learn about it, finding out that I have...
... a wasp species (Prionyx parkeri) that controls short-horned grasshopper populations and pollinates flowers...
... or a fly species, tiger bee fly (Xenox tigrinus), that parasitizes carpenter bees and balances their populations...
... or yet another syrphid fly whose larvae eats aphids. (The syrphid fly larva is the large, brown and white blob on the milkweed stem, surrounded by its food, oleander aphids.)
The complex web of relationships in even my basic little gardens truly astounds me, and I learn so much by identifying the different species and researching a bit about their life cycles and feeding habits. I try to share that information with others, too, hoping to encourage fellow gardeners to just relax and let Mother Nature keep the balance in their yards instead of pulling out the poisons to "keep everything under control".
In fact, thanks in great part to the insect identification help I've received from BugGuide, I've come to think that human "control" is highly over-rated and much more likely to do harm than good, especially in a garden. What insects are YOU seeing in your garden, and what are you learning about the balance of nature all around you? Have you dared to go chemical free yet?
Showing posts with label Organic Gardening. Show all posts
Sunday, August 12, 2018
Monday, April 30, 2018
Living With Southern Magnolias
A dear friend of ours loves southern magnolias and has tried to grow them in her suburban Chicago yard. She fell in love with the species many years ago when her father grew one in their yard in Wichita, Kansas. Plus, it's a challenge to grow them in Chicago - right?!
Despite covering the small tree with burlap to protect it from the harsh winters of northern Illinois, there is no young southern magnolia permanently gracing their yard yet. As its name suggests, southern magnolia prefers the south lands.
Indeed, southern magnolias (Magnolia grandiflora) aren't a challenge to grow here in the Florida panhandle at all. Truthfully, it's more of a challenge NOT to grow them here, given how easily they sprout from the numerous seeds produced each year.
We inherited 2 large southern magnolias when we purchased our home 3 years ago - one in the front by the driveway and one in the back by the bedrooms. Both are within 25 feet of the house. There are 2 more southern magnolias, much smaller, along the side of the yard, and a 5th next to our neighbor's house, just over the property line. Each of our neighbors' yards also boasts a large one at the far back, hanging over the shore of the lake. We've rapidly gained a fair amount of experience gardening with - and under - this species.
This is the first time I've had large southern magnolias in my yard and I'm developing a distinctly bipolar, love/hate relationship with them. Sorry, Shelley, but sometimes these guys do TOO well to fit in a yard or garden comfortably.
For starters, let me be positive. Wildlife loves southern magnolias and I constantly see birds foraging among the branches.
Well.... To actually be accurate, I have to say that I frequently see birds fly into the tree(s) and I occasionally get a glimpse of them as they move through the heavy canopy of large, dark leaves, presumably foraging. I know my southern magnolias get a LOT of use, but most of the time I'm darned if I can really see what's going on up there.
Those large leaves are where the love/hate part of the southern magnolia equation comes in for me. The shade cast by southern magnolias is dense. Here in our yard, even the shade of the individual tree that has been limbed up halfway to heaven casts a deep shadow on the house. Some days our home feels positively gloomy with the sun blocked so thoroughly by these dark guardians.
While southern magnolias are evergreen, that doesn't mean that the individual leaves remain on the tree longer than leaves on other trees. It just means that the leaves don't all fall at once. Indeed, the leaves fall constantly throughout the year in a never-ending rain of big, waxy, plant smothering, brown layers. Some gardeners think that southern magnolia leaves decompose slowly, but they rot almost as fast as the much smaller oak leaves that also fall in our yard. The difference is that the individual oak leaves don't cover entire plant crowns when they land, giving the plants below them a chance of finding daylight sometime within the next year.
In the photo above, a 2 year old golden alexander (Zizia aurea) struggles to keep above the gathering magnolia leaves.
I've decided that one of the anti-competition strategies developed by southern magnolias is the ability of those fallen leaves to smother all plants that attempt to grow within their drip line.
Even lawn under trimmed-up magnolia trees can be a challenge. The leaves in the photo above have accumulated just since the last lawn mowing, maybe 10 days ago. You can see how the heavy leaves can quickly smother even healthy grass if they are not removed, let alone what they are able to do to more delicate plants like ferns or small perennials.
To add to the joy brought by the continuous shower of large leaves in the garden, those same leaves often curl as they die and drop, cupping in a way that holds water if it happens to rain. Since we get a LOT of rain here along the Gulf Coast, that's not an infrequent occurrence. With humidity levels that prefer to linger between 75% and 95%, the tiny water pools in the magnolia leaves don't evaporate very fast and certain mosquito species have adapted to lay their eggs in these tiny personal incubation ponds. Southern magnolias might well be nicknamed mosquito trees down here. (Note: See the P.S.S. at the end of this rambling commentary.)
Recently I've noted that it's not only the large leaves that hold water once they fall from this giant tree - the huge white petals of the grand flowers (M. grandiflora) do as well, after they've finished their job of attracting insects and they have gracefully drifted down to the ground.
I don't mean to be completely negative. The giant blossoms look and smell wonderful, after all.
Then there are the snazzy looking seedpods that develop from the large, sumptuous white flowers.
These seedpods are seriously cool: fuzzy, brown or brownish green, stemmed grenades with an intricate arrangement of little holes that each hold a bright red seed or two if that ovary was fertilized. I LOVE the seedpods...most of the time. Unfortunately, these spectacular structures are also quite heavy and surprisingly spiky, given their soft appearance. We park our cars under the front magnolia and have had the roof dented by a particularly weighty magnolia seedpod that fell on it. I have nightmares about what it would feel like to have one fall on my head.
Not only are these fist-sized seedpods weighty and prickly, they are also impressively abundant, landing in the flowerbeds, as well as on the lawn, sidewalks, and driveways. Once on the ground, they defy the most powerful of leaf blowers to move them and they dull any mower blades that dare to bite into them. Unlike the leaves, magnolia seedpods do take a long time to decompose, so there gets to be quite a buildup of them over time, providing a cobblestone like texture to the soil beneath the parent tree. Oh, to have grandkids old enough to want to earn a bit of money by gathering them all up to send to the landfill.....
Thinking about the seedpods that bear the magnolia seeds brings me back, full circle, to how well southern magnolias grow around here. Each of those gorgeous red seeds has the potential to put down roots and become a NEW (giant) southern magnolia - and a surprising number of the seeds make the attempt. I am constantly pulling up seedlings - or saplings, if I've missed a hidden sprout. It doesn't take long for a dainty, little seedling to develop into a sturdy, small tree that gives obvious promise of its eventual ability to heave up concrete and dominate the space around it.
Despite its challenges for the home gardener, southern magnolia is an awesome tree perfectly made for the Gulf Coast. Even though those huge leaves seem like they'd catch the wind enough to uproot the tree, it is one of the top 3 trees for hurricane resistance. Southern magnolias grow superbly in a variety of soils, including the deep sand that makes up our local landscape.
All that said, given my druthers, I'd plant this tree in the back of the yard, along the lake shore, where its leaves could accumulate to their hearts' content or could float away to decompose in downstream waters.
Since I didn't get a choice about siting these trees in my yard, I manage in the best way I can. For me, that means going out periodically and (literally) picking up, by hand, the leaves that have fallen into the flower beds.
Here is a trug with the leaves that I picked off the lyre-leaf sage (Salvia lyrata) just to the right of it....
Combined with the magnolia leaves we rake off the lawn and blow off the driveway and walkways, these waxy packets of organic matter can be chopped up with a combination of lawnmower and leaf blower into pieces that no longer hold water, then dumped back into the beds to decompose and enrich the soil.
The small pile of chopped leaves above, with 3 whole leaves for contrast, gives a sense of the great leaf mulch that magnolia leaves can provide, with a little effort on the part of the gardener. And, oh, the resulting soil is so wonderfully rich!
Sometimes, while I'm picking up the leaves, I'm graced with the sight of an anole sunning in a shrub, a brown skink skittering through the litter, a dark-winged damselfly waiting to give chase, or a wolf snail hunting its prey. I've slowed down, sat down, and started moving at the patient pace of nature. In the end, that deliberateness is a gift of incalculable value, opening windows into the world around me.
P.S. I was out front picking up magnolia leaves from in between fern fronds and other plants this afternoon, wondering how silly I looked to the neighbors as I spent my time in this manner. Then I stopped and asked myself what other people were likely to be doing at that very moment. Watching TV? Checking out Facebook? Recreational shopping? This close to the Gulf, many folks were likely to be at the beach, lying on the sand. Nobody would think twice about whether any of those activities were "worthwhile", so why was I worrying about looking silly as I picked up magnolia leaves in the garden? I was outside (in the shade), enjoying a beautiful day, listening to birds singing, watching for little critters among the plants as I removed and gathered the smothering leaves. No matter what anyone else thinks, I certainly could have spent my afternoon in a much less enjoyable and productive manner!
P.S.S. While I was picking up leaves, I noticed that quite a few of them were "pre-drilled" with drainage holes..... Thank you, fungi, caterpillars or whatever other natural phenomenon might have created those holes! Another benefit of letting nature balance itself.
Despite covering the small tree with burlap to protect it from the harsh winters of northern Illinois, there is no young southern magnolia permanently gracing their yard yet. As its name suggests, southern magnolia prefers the south lands.
Indeed, southern magnolias (Magnolia grandiflora) aren't a challenge to grow here in the Florida panhandle at all. Truthfully, it's more of a challenge NOT to grow them here, given how easily they sprout from the numerous seeds produced each year.
We inherited 2 large southern magnolias when we purchased our home 3 years ago - one in the front by the driveway and one in the back by the bedrooms. Both are within 25 feet of the house. There are 2 more southern magnolias, much smaller, along the side of the yard, and a 5th next to our neighbor's house, just over the property line. Each of our neighbors' yards also boasts a large one at the far back, hanging over the shore of the lake. We've rapidly gained a fair amount of experience gardening with - and under - this species.
This is the first time I've had large southern magnolias in my yard and I'm developing a distinctly bipolar, love/hate relationship with them. Sorry, Shelley, but sometimes these guys do TOO well to fit in a yard or garden comfortably.
For starters, let me be positive. Wildlife loves southern magnolias and I constantly see birds foraging among the branches.
Well.... To actually be accurate, I have to say that I frequently see birds fly into the tree(s) and I occasionally get a glimpse of them as they move through the heavy canopy of large, dark leaves, presumably foraging. I know my southern magnolias get a LOT of use, but most of the time I'm darned if I can really see what's going on up there.
Those large leaves are where the love/hate part of the southern magnolia equation comes in for me. The shade cast by southern magnolias is dense. Here in our yard, even the shade of the individual tree that has been limbed up halfway to heaven casts a deep shadow on the house. Some days our home feels positively gloomy with the sun blocked so thoroughly by these dark guardians.
While southern magnolias are evergreen, that doesn't mean that the individual leaves remain on the tree longer than leaves on other trees. It just means that the leaves don't all fall at once. Indeed, the leaves fall constantly throughout the year in a never-ending rain of big, waxy, plant smothering, brown layers. Some gardeners think that southern magnolia leaves decompose slowly, but they rot almost as fast as the much smaller oak leaves that also fall in our yard. The difference is that the individual oak leaves don't cover entire plant crowns when they land, giving the plants below them a chance of finding daylight sometime within the next year.
In the photo above, a 2 year old golden alexander (Zizia aurea) struggles to keep above the gathering magnolia leaves.
I've decided that one of the anti-competition strategies developed by southern magnolias is the ability of those fallen leaves to smother all plants that attempt to grow within their drip line.
Even lawn under trimmed-up magnolia trees can be a challenge. The leaves in the photo above have accumulated just since the last lawn mowing, maybe 10 days ago. You can see how the heavy leaves can quickly smother even healthy grass if they are not removed, let alone what they are able to do to more delicate plants like ferns or small perennials.
To add to the joy brought by the continuous shower of large leaves in the garden, those same leaves often curl as they die and drop, cupping in a way that holds water if it happens to rain. Since we get a LOT of rain here along the Gulf Coast, that's not an infrequent occurrence. With humidity levels that prefer to linger between 75% and 95%, the tiny water pools in the magnolia leaves don't evaporate very fast and certain mosquito species have adapted to lay their eggs in these tiny personal incubation ponds. Southern magnolias might well be nicknamed mosquito trees down here. (Note: See the P.S.S. at the end of this rambling commentary.)
Recently I've noted that it's not only the large leaves that hold water once they fall from this giant tree - the huge white petals of the grand flowers (M. grandiflora) do as well, after they've finished their job of attracting insects and they have gracefully drifted down to the ground.
I don't mean to be completely negative. The giant blossoms look and smell wonderful, after all.
Then there are the snazzy looking seedpods that develop from the large, sumptuous white flowers.
These seedpods are seriously cool: fuzzy, brown or brownish green, stemmed grenades with an intricate arrangement of little holes that each hold a bright red seed or two if that ovary was fertilized. I LOVE the seedpods...most of the time. Unfortunately, these spectacular structures are also quite heavy and surprisingly spiky, given their soft appearance. We park our cars under the front magnolia and have had the roof dented by a particularly weighty magnolia seedpod that fell on it. I have nightmares about what it would feel like to have one fall on my head.
Not only are these fist-sized seedpods weighty and prickly, they are also impressively abundant, landing in the flowerbeds, as well as on the lawn, sidewalks, and driveways. Once on the ground, they defy the most powerful of leaf blowers to move them and they dull any mower blades that dare to bite into them. Unlike the leaves, magnolia seedpods do take a long time to decompose, so there gets to be quite a buildup of them over time, providing a cobblestone like texture to the soil beneath the parent tree. Oh, to have grandkids old enough to want to earn a bit of money by gathering them all up to send to the landfill.....
Thinking about the seedpods that bear the magnolia seeds brings me back, full circle, to how well southern magnolias grow around here. Each of those gorgeous red seeds has the potential to put down roots and become a NEW (giant) southern magnolia - and a surprising number of the seeds make the attempt. I am constantly pulling up seedlings - or saplings, if I've missed a hidden sprout. It doesn't take long for a dainty, little seedling to develop into a sturdy, small tree that gives obvious promise of its eventual ability to heave up concrete and dominate the space around it.
Despite its challenges for the home gardener, southern magnolia is an awesome tree perfectly made for the Gulf Coast. Even though those huge leaves seem like they'd catch the wind enough to uproot the tree, it is one of the top 3 trees for hurricane resistance. Southern magnolias grow superbly in a variety of soils, including the deep sand that makes up our local landscape.
All that said, given my druthers, I'd plant this tree in the back of the yard, along the lake shore, where its leaves could accumulate to their hearts' content or could float away to decompose in downstream waters.
Since I didn't get a choice about siting these trees in my yard, I manage in the best way I can. For me, that means going out periodically and (literally) picking up, by hand, the leaves that have fallen into the flower beds.
Here is a trug with the leaves that I picked off the lyre-leaf sage (Salvia lyrata) just to the right of it....
Combined with the magnolia leaves we rake off the lawn and blow off the driveway and walkways, these waxy packets of organic matter can be chopped up with a combination of lawnmower and leaf blower into pieces that no longer hold water, then dumped back into the beds to decompose and enrich the soil.
The small pile of chopped leaves above, with 3 whole leaves for contrast, gives a sense of the great leaf mulch that magnolia leaves can provide, with a little effort on the part of the gardener. And, oh, the resulting soil is so wonderfully rich!
Sometimes, while I'm picking up the leaves, I'm graced with the sight of an anole sunning in a shrub, a brown skink skittering through the litter, a dark-winged damselfly waiting to give chase, or a wolf snail hunting its prey. I've slowed down, sat down, and started moving at the patient pace of nature. In the end, that deliberateness is a gift of incalculable value, opening windows into the world around me.
P.S. I was out front picking up magnolia leaves from in between fern fronds and other plants this afternoon, wondering how silly I looked to the neighbors as I spent my time in this manner. Then I stopped and asked myself what other people were likely to be doing at that very moment. Watching TV? Checking out Facebook? Recreational shopping? This close to the Gulf, many folks were likely to be at the beach, lying on the sand. Nobody would think twice about whether any of those activities were "worthwhile", so why was I worrying about looking silly as I picked up magnolia leaves in the garden? I was outside (in the shade), enjoying a beautiful day, listening to birds singing, watching for little critters among the plants as I removed and gathered the smothering leaves. No matter what anyone else thinks, I certainly could have spent my afternoon in a much less enjoyable and productive manner!
P.S.S. While I was picking up leaves, I noticed that quite a few of them were "pre-drilled" with drainage holes..... Thank you, fungi, caterpillars or whatever other natural phenomenon might have created those holes! Another benefit of letting nature balance itself.
Friday, September 22, 2017
Secrets of An Assassin Bug's Diet, or Beware of First Impressions!
When I went out with the dog, first thing this morning, I noticed a ladybug on one of my milkweeds, so I went inside and grabbed my camera to photograph it. I just don't see ladybugs very often any more. The ladybug turned out to be a Multi-Colored Asian Lady Beetle (Harmonia axyridis), which is very disappointing but not too surprising. This is the species that is displacing so many of our native ladybugs.
As usually happens when I get my camera out, however, I found a couple other things to photograph while I was outside, and I'd like to share one of them with you tonight.
As I was photographing the ladybug, I noticed another orangish red and black insect nearby, a nymph of a Milkweed Assassin Bug (Zelus longipes). I'm fairly used to seeing these in my garden nowadays, so I didn't pay too much attention to it at first....
Then I noticed the long, small, white insect it was eating. "Damn!" I thought to myself, "It's a tiny monarch caterpillar! No wonder I haven't been seeing any larger monarch caterpillars around."
Since I'm a pretty firm believer in "the circle of life", especially when the life forms involved are native, I did nothing but take a couple pictures. The assassin bug nymph soon finished its meal and started hunting again, but I didn't notice it capture anything else.
Tonight I went through this morning's photos on the computer - and, lo and behold, that wasn't a tiny monarch caterpillar! The Milkweed Assassin Bug nymph was actually eating a newly molted (still white) leafhopper! The leafhopper was just so small that my eyes couldn't make out what it actually was until the magic of photography enlarged it for me.
I have no idea which species of leafhopper this was, but all leafhoppers drink plant sap, so this is a perfect example of a predator keeping a plant-eating insect population under control. (To be brutally honest, of course, the same could be said if the assassin bug HAD actually been eating a monarch caterpillar.)
Once again I had a dope slap moment and had to remind myself not to jump to conclusions when I'm out in the garden, observing. I am continually amazed at the intricate functioning of the web of life...when we humans can avoid mucking around with it.
As usually happens when I get my camera out, however, I found a couple other things to photograph while I was outside, and I'd like to share one of them with you tonight.
As I was photographing the ladybug, I noticed another orangish red and black insect nearby, a nymph of a Milkweed Assassin Bug (Zelus longipes). I'm fairly used to seeing these in my garden nowadays, so I didn't pay too much attention to it at first....
Then I noticed the long, small, white insect it was eating. "Damn!" I thought to myself, "It's a tiny monarch caterpillar! No wonder I haven't been seeing any larger monarch caterpillars around."
Since I'm a pretty firm believer in "the circle of life", especially when the life forms involved are native, I did nothing but take a couple pictures. The assassin bug nymph soon finished its meal and started hunting again, but I didn't notice it capture anything else.
Tonight I went through this morning's photos on the computer - and, lo and behold, that wasn't a tiny monarch caterpillar! The Milkweed Assassin Bug nymph was actually eating a newly molted (still white) leafhopper! The leafhopper was just so small that my eyes couldn't make out what it actually was until the magic of photography enlarged it for me.
I have no idea which species of leafhopper this was, but all leafhoppers drink plant sap, so this is a perfect example of a predator keeping a plant-eating insect population under control. (To be brutally honest, of course, the same could be said if the assassin bug HAD actually been eating a monarch caterpillar.)
Once again I had a dope slap moment and had to remind myself not to jump to conclusions when I'm out in the garden, observing. I am continually amazed at the intricate functioning of the web of life...when we humans can avoid mucking around with it.
Labels:
Assassin Bugs,
Ladybugs,
Milkweed,
Organic Gardening,
Predator-Prey
Thursday, September 21, 2017
Am I Still On Track?
Reading a magazine about blogging earlier this week, I tried to remember exactly why I began Gaia Garden. Was it simply to share the photos I was taking as I gardened? To share the plants and animals I found as my hands dug in the soil surrounding our home? Amazingly, I realized that I started writing this blog over 11 1/2 years - and 2 gardens - ago, in March 2006, while we lived in Mobile, Alabama. I must say that my memory is fuzzy on many of the details. I do remember clearly, though, that our son Sean had a LOT to do with my starting this blog. He basically bullied me into picking a name ("It doesn't have to be perfect, Mom!"), picked a platform he felt would work well for me, and in those lovingly irritating ways, actually got me online with my first posts.
To refresh my mind about my deeper motivations, however, I decided to go back to the earliest posts and see what I had to say for myself....
In my very first post, "New Beginnings", I wrote that "...it's not just gardening that interests me. It's gardening within the genius of the place, gardening that celebrates the local flora and fauna." That certainly still rings true. If anything, I think I've become even more fascinated by what is now known as "gardening with native plants". I like the way I phrased it back then, though. "The genius of the place..." It sounds much softer, even somewhat romantic. That is a concept that I haven't thought about for a long time.
So different from the prairies of southcentral Kansas and our last garden, the "genius of the place" here in our Florida panhandle neighborhood is reflected in Spanish moss literally dripping from evergreen oak trees.
A little further along in that same post, I mentioned hoping to gently encourage a sense of cooperation between gardeners and the natural elements in their gardens, as opposed to the more common combative feel of gardeners battling nature's tendencies. At least in my own mind, this concept is central to most of my posts to this day.
Towards the end of that original post, I started to wrap up by expressing a broadening mission for my new blog: "Since gardening works so well as a metaphor for living, along the way I expect to be looking for ties to philosophy, politics, literature, and any other subject that "crops up." I hope to hear from others who are similarly involved...or even just interested in the process."
It's in that final, broader hope for where my blog might lead me that I feel I've perhaps lost my way. In recent years I have found it quicker and easier to share photos and explore what I'm actually seeing as I garden than it has been for me to delve into other facets of life that I think about or learn while I'm getting my hands dirty.
So my blog has become more photo driven. Is that a good thing...or not? We all seem to respond instinctively to photos, so in that regard it's helpful, but it can also be limiting to rely too heavily on them. For example, so far in 2017, the only "philosophical" post that I have written was to think a bit about what I think about as I garden. Hardly deep stuff, but I was able to find photos to illustrate my thoughts!
It's also not deep (literary) stuff, but if a book seems relevant to science or gardening or the environment, I still do book reviews, as in this 2014 post about "A Sting in the Tale" by Dave Goulson. In the last several years, though, this is about as close to "...ties to philosophy, politics, literature..." beyond gardening as I get. Sigh.
Another big change I see in my post topics, compared to 2006, is that I am a lot more involved these days in identifying insects and figuring out what they are doing in the garden. For example, note this little halictid bee, feeding on the nectar and pollen of the Gaillardia bloom - and pollinating the plant in the process. Sometimes I actually feel as if growing plants has now become secondary, for me, to learning about and nurturing bees, butterflies, spiders, and other wildlife in my gardens! Ironically, photos are a big part of WHY this change has occurred, as I got a DSLR camera several years ago and am now able to take pictures of a small insect, enlarge them, and identify the species. Knowing the actual identity of the insect I'm seeing allows me to research its biology. In fact, I'm becoming quite the bug nerd, at least in my own mind.
Well, it's time to wrap this up. Enough navel gazing.
Upshot? In general, I think I'm still on track. I'd like to work in some more "tangential" subjects as blog post topics, if only because I'm finding it fun to go back and read those posts, years later.
For my own sanity, I'd like to get back into regular posting - blogging feels creative in a way that Facebook posts don't. I think more carefully about what I'm saying when I write a full blog post, and I rework the wording to get as precise as possible about what I mean. I can more easily choose my topics, too, which in this current political clime is not all bad.
So, onward into the next 11 1/2 years! I wonder how many gardens I'll have made in that next interval of time - and where we'll be putting our literal and figurative roots down by then?
To refresh my mind about my deeper motivations, however, I decided to go back to the earliest posts and see what I had to say for myself....
In my very first post, "New Beginnings", I wrote that "...it's not just gardening that interests me. It's gardening within the genius of the place, gardening that celebrates the local flora and fauna." That certainly still rings true. If anything, I think I've become even more fascinated by what is now known as "gardening with native plants". I like the way I phrased it back then, though. "The genius of the place..." It sounds much softer, even somewhat romantic. That is a concept that I haven't thought about for a long time.
So different from the prairies of southcentral Kansas and our last garden, the "genius of the place" here in our Florida panhandle neighborhood is reflected in Spanish moss literally dripping from evergreen oak trees.
A little further along in that same post, I mentioned hoping to gently encourage a sense of cooperation between gardeners and the natural elements in their gardens, as opposed to the more common combative feel of gardeners battling nature's tendencies. At least in my own mind, this concept is central to most of my posts to this day.
Towards the end of that original post, I started to wrap up by expressing a broadening mission for my new blog: "Since gardening works so well as a metaphor for living, along the way I expect to be looking for ties to philosophy, politics, literature, and any other subject that "crops up." I hope to hear from others who are similarly involved...or even just interested in the process."
It's in that final, broader hope for where my blog might lead me that I feel I've perhaps lost my way. In recent years I have found it quicker and easier to share photos and explore what I'm actually seeing as I garden than it has been for me to delve into other facets of life that I think about or learn while I'm getting my hands dirty.
So my blog has become more photo driven. Is that a good thing...or not? We all seem to respond instinctively to photos, so in that regard it's helpful, but it can also be limiting to rely too heavily on them. For example, so far in 2017, the only "philosophical" post that I have written was to think a bit about what I think about as I garden. Hardly deep stuff, but I was able to find photos to illustrate my thoughts!
It's also not deep (literary) stuff, but if a book seems relevant to science or gardening or the environment, I still do book reviews, as in this 2014 post about "A Sting in the Tale" by Dave Goulson. In the last several years, though, this is about as close to "...ties to philosophy, politics, literature..." beyond gardening as I get. Sigh.
Another big change I see in my post topics, compared to 2006, is that I am a lot more involved these days in identifying insects and figuring out what they are doing in the garden. For example, note this little halictid bee, feeding on the nectar and pollen of the Gaillardia bloom - and pollinating the plant in the process. Sometimes I actually feel as if growing plants has now become secondary, for me, to learning about and nurturing bees, butterflies, spiders, and other wildlife in my gardens! Ironically, photos are a big part of WHY this change has occurred, as I got a DSLR camera several years ago and am now able to take pictures of a small insect, enlarge them, and identify the species. Knowing the actual identity of the insect I'm seeing allows me to research its biology. In fact, I'm becoming quite the bug nerd, at least in my own mind.
Well, it's time to wrap this up. Enough navel gazing.
Upshot? In general, I think I'm still on track. I'd like to work in some more "tangential" subjects as blog post topics, if only because I'm finding it fun to go back and read those posts, years later.
For my own sanity, I'd like to get back into regular posting - blogging feels creative in a way that Facebook posts don't. I think more carefully about what I'm saying when I write a full blog post, and I rework the wording to get as precise as possible about what I mean. I can more easily choose my topics, too, which in this current political clime is not all bad.
So, onward into the next 11 1/2 years! I wonder how many gardens I'll have made in that next interval of time - and where we'll be putting our literal and figurative roots down by then?
Tuesday, September 20, 2016
A Trickle of Native Insects Begins to Appear....
FINALLY! We've lived here for about 16 months now and at last I am beginning to see a greater variety of insects attracted to and living in our yard. It's so exciting to go outside and see native pollinators nectaring at the few little blooms we have scattered around, or predatory insects patrolling the foliage and flowers. It sure goes to show that changes don't have to be big or dramatic to have an impact. Every little bit counts.
So here are some of my recent finds....
Gulf fritillaries (Agraulis vanillae) are gorgeous butterflies, with silver patterns on the undersides of their wings and an almost fluorescent orange coloration on the top side. The fresh individual in the top photo was nectaring at garden phlox (Phlox paniculata), while the tattered one in the lower photo is nectarying at Flyr's Nemesis (Brickellia cordifolia), a rare wildflower in Florida that has recently become available at some native plant nurseries, including 7 Pines Native Plant Nursery in DeFuniak Springs.
Out and about, I'm seeing more gulf fritillaries flying everywhere these days, presumably due to the time of year. However, I'm starting to count on seeing them regularly in our yard since we finally have some caterpillars eating the maypop vines (Passiflora incarnata) that we planted on the lower terraces last spring. Just as monarch caterpillars only eat milkweeds, plants in the genus Asclepias, so gulf fritillary caterpillars only eat maypops and passionflowers, plants in the genus Passiflora.
Predators are pretty rare in the yard still. It took me around 5 years to start noticing them regularly in my Kansas gardens, so I'm trusting that they'll increase in number as I garden naturally here.
With a lake right out the back door, however, we do have several dragonfly and damselfly species. One of the species I've just started to see is the eastern amberwing (Perithemis tenera). A male and a female have staked out the small patch of powderpuff (Mimosa strigillosa) in the front yard and I can count on finding them there essentially every day.
Although this species is quite small for a dragonfly, the male eastern amberwing, shown above, is easy to spot since he's dramatically colored, with shining amber-colored wings and a darker amber body. Up close, the camera captures yellow markings on the thorax and abdomen that the eye generally misses. The female, however, is much different....
...and much drabber. Her darkly blotched wings and more sober colors don't attract the eye as her mate's colors do, but that's probably the point. She, too, has yellow markings on her thorax and abdomen.
These small dragonflies are said to eat "tiny, flying insects", which I interpret to mean mosquitoes. Hopefully my male and female eastern amberwings will produce lots and lots of baby eastern amberwings to patrol my yard even more thoroughly!
Another colorful species that I've observed, photographed, and been able to identify is the metallic green bee, Agapostemon splendens. I've always loved the metallic green bees, especially the ones that are entirely green, because of their vibrant coloring.
Shown above, the females of Agapostemon splendens are especially beautiful to my eye and earn their "splendid" moniker based on the beautiful shadings of blue and green on their abdomen. Note: I have no real idea why this species was labeled the splendid green metallic bee, but I think the abdomenal color IS splendid.
Here's another, closer look at that gorgeous color. Look, too, at the pollen load that this little bee is carrying - the pollen from this species of flower is white, not yellow, and that's a LOT of pollen clustered on her hind legs! She still has to finish her load and, most importantly, fly back to her nest with her carefully gathered provisions. Like many other native bees, the Agapostemon bees nest in the ground, usually in a tunnel dug by the female. After digging the tunnel, the female gathers together a ball of pollen and nectar, lays an egg on it, seals off the cell, and repeats the process several times.
Interestingly, like the eastern amberwing dragonfly above, Agapostemon splendens is another dimorphic insect species, with the male looking significantly different from the female. The photo above is a male of the same species. While the thorax is similar to the female's, the abdomen is completely different - males sporting a natty black and yellow stripe pattern that is vibrant, but not as pleasing to my eye. This little guy was fun to watch. He seemed to perform head stands as he fed, diving deeply into the flower to get his prize.
Unlike the colorful green metallic bees, the next bees I want to share with you are somber black with a few white markings.
Another native bee, this is a carpenter-mimic cuckoo-leaf-cutter (Coelioxys dolichos) - a name that seems more interesting than the bee looks, at least on first appraisal. That's the bloom of a wild lettuce (Lactuca sp.) that she's feeding on.
What drew my attention to this bee was the pointed abdomen, which is very distinctive. Cuckoo bees are parasites on other bees. The females of this genus of cuckoo bee, Coelioxys, use that sharp abdomen to break into the nests of their host species and lay eggs on the pollen and nectar stored there for the host's eggs. Because female cuckoo bees don't have to provision their own nests, they don't have pollen baskets and they aren't seen carrying pollen; they do, however, still have to feed themselves.
This particular species, the carpenter-mimic cuckoo-leaf-cutter, is a parasite on a single bee species called the carpenter-mimic leaf-cutter bee (Megachile xylocopoides). Ironically, when I went to look up M. xylocopoides, I recognized the pictures as showing the same species as another, unidentified bee species in my recent photos! I even took the photos of the two different species within a few feet of each other, just 1 day apart!
Here is the male carpenter-mimic leaf-cutter bee (Megachile xylocopoides), also feeding on wild lettuce blooms. Did the two bees, the predator and the prey, hatch out of the same nest? There's probably a good chance of it. At the very least, it would appear that the nests were nearby.
There are many more sightings I'd love to share, but this post is long enough for now. Hope you're seeing lots of interesting insects in your gardens, too!
So here are some of my recent finds....
Gulf fritillaries (Agraulis vanillae) are gorgeous butterflies, with silver patterns on the undersides of their wings and an almost fluorescent orange coloration on the top side. The fresh individual in the top photo was nectaring at garden phlox (Phlox paniculata), while the tattered one in the lower photo is nectarying at Flyr's Nemesis (Brickellia cordifolia), a rare wildflower in Florida that has recently become available at some native plant nurseries, including 7 Pines Native Plant Nursery in DeFuniak Springs.
Out and about, I'm seeing more gulf fritillaries flying everywhere these days, presumably due to the time of year. However, I'm starting to count on seeing them regularly in our yard since we finally have some caterpillars eating the maypop vines (Passiflora incarnata) that we planted on the lower terraces last spring. Just as monarch caterpillars only eat milkweeds, plants in the genus Asclepias, so gulf fritillary caterpillars only eat maypops and passionflowers, plants in the genus Passiflora.
Predators are pretty rare in the yard still. It took me around 5 years to start noticing them regularly in my Kansas gardens, so I'm trusting that they'll increase in number as I garden naturally here.
With a lake right out the back door, however, we do have several dragonfly and damselfly species. One of the species I've just started to see is the eastern amberwing (Perithemis tenera). A male and a female have staked out the small patch of powderpuff (Mimosa strigillosa) in the front yard and I can count on finding them there essentially every day.
Although this species is quite small for a dragonfly, the male eastern amberwing, shown above, is easy to spot since he's dramatically colored, with shining amber-colored wings and a darker amber body. Up close, the camera captures yellow markings on the thorax and abdomen that the eye generally misses. The female, however, is much different....
...and much drabber. Her darkly blotched wings and more sober colors don't attract the eye as her mate's colors do, but that's probably the point. She, too, has yellow markings on her thorax and abdomen.
These small dragonflies are said to eat "tiny, flying insects", which I interpret to mean mosquitoes. Hopefully my male and female eastern amberwings will produce lots and lots of baby eastern amberwings to patrol my yard even more thoroughly!
Another colorful species that I've observed, photographed, and been able to identify is the metallic green bee, Agapostemon splendens. I've always loved the metallic green bees, especially the ones that are entirely green, because of their vibrant coloring.
Shown above, the females of Agapostemon splendens are especially beautiful to my eye and earn their "splendid" moniker based on the beautiful shadings of blue and green on their abdomen. Note: I have no real idea why this species was labeled the splendid green metallic bee, but I think the abdomenal color IS splendid.
Here's another, closer look at that gorgeous color. Look, too, at the pollen load that this little bee is carrying - the pollen from this species of flower is white, not yellow, and that's a LOT of pollen clustered on her hind legs! She still has to finish her load and, most importantly, fly back to her nest with her carefully gathered provisions. Like many other native bees, the Agapostemon bees nest in the ground, usually in a tunnel dug by the female. After digging the tunnel, the female gathers together a ball of pollen and nectar, lays an egg on it, seals off the cell, and repeats the process several times.
Interestingly, like the eastern amberwing dragonfly above, Agapostemon splendens is another dimorphic insect species, with the male looking significantly different from the female. The photo above is a male of the same species. While the thorax is similar to the female's, the abdomen is completely different - males sporting a natty black and yellow stripe pattern that is vibrant, but not as pleasing to my eye. This little guy was fun to watch. He seemed to perform head stands as he fed, diving deeply into the flower to get his prize.
Unlike the colorful green metallic bees, the next bees I want to share with you are somber black with a few white markings.
Another native bee, this is a carpenter-mimic cuckoo-leaf-cutter (Coelioxys dolichos) - a name that seems more interesting than the bee looks, at least on first appraisal. That's the bloom of a wild lettuce (Lactuca sp.) that she's feeding on.
What drew my attention to this bee was the pointed abdomen, which is very distinctive. Cuckoo bees are parasites on other bees. The females of this genus of cuckoo bee, Coelioxys, use that sharp abdomen to break into the nests of their host species and lay eggs on the pollen and nectar stored there for the host's eggs. Because female cuckoo bees don't have to provision their own nests, they don't have pollen baskets and they aren't seen carrying pollen; they do, however, still have to feed themselves.
This particular species, the carpenter-mimic cuckoo-leaf-cutter, is a parasite on a single bee species called the carpenter-mimic leaf-cutter bee (Megachile xylocopoides). Ironically, when I went to look up M. xylocopoides, I recognized the pictures as showing the same species as another, unidentified bee species in my recent photos! I even took the photos of the two different species within a few feet of each other, just 1 day apart!
Here is the male carpenter-mimic leaf-cutter bee (Megachile xylocopoides), also feeding on wild lettuce blooms. Did the two bees, the predator and the prey, hatch out of the same nest? There's probably a good chance of it. At the very least, it would appear that the nests were nearby.
There are many more sightings I'd love to share, but this post is long enough for now. Hope you're seeing lots of interesting insects in your gardens, too!
Monday, July 11, 2016
A Satellite Garden for Pollinators...in Boston
Several years ago our son purchased a condo in Somerville, Massachusetts. As is typical in a large metropolitan area, there isn't much land around the building, but Sean's been talking with me about creating a pollinator garden on the small plot that he has. Over the 4th of July weekend, we were finally able to make that happen.
Here is the space that we started with.....
Of course, since we're talking an area that has been built on for over a century, there was plant material already in place. Most of it was exotic, if not exotic AND invasive: black swallow-wort (a vine related to milkweed), Vinca minor, white sweet clover, crabgrass, fescue, and a cranesbill of some sort. We removed all of these except the cranesbill, which didn't seem to be invasive and which was creating a nice small carpet with a few purple flowers.
Then there were the native plants: an oak seedling, 2 maple seedlings, lots of hay fern, and and a couple violets. Pretty as the hay fern was, it was obviously too aggressive for this small an area, so we reluctantly removed it. There was still plenty of it on the north side of the house. Of course, the tree seedlings had to go, too. This is definitely not a big enough space for an oak or maple tree. We did try to keep the violets...although they got pretty mangled during the whole process.
The large shrub at the north end of the garden space is an old privet which technically belongs to the next door neighbor, so we didn't try to do anything with it. There is black swallow-wort and Boston ivy growing up in it, as well as a maple seedling or two, so Sean will have to keep a close eye on it to keep those plants from infringing on his new pollinator garden.
My biggest concern for this project was finding appropriate, non-pesticide treated, native plants to form the biological base of the new garden. Searching online, I located Garden in the Woods, a nature area run by the New England Wildflower Society. It's in Framingham, which isn't too far out of the city, and they sell native plants. We fired up the cell phone navigation system and made our way out there on Saturday morning. Woohoo! Paydirt! Even in early July, long after sensible people have put in their new gardens or renovated their old ones, Garden in the Woods still had a nice selection of Massachusetts' native plants. My only regret in going there was that we didn't have time to hike their trails.
On the way back, with Sean's car mostly full of native perennials, we stopped at Russell's Garden Center and bought a few tools, compost and mulch (plus a small butterfly milkweed). Now the car was really loaded down.
I should have taken a photo of the car, but I didn't think about it. I was too psyched about getting busy, digging in the dirt.
Luckily for me, I got to be the "consultant". Sean did the vast majority of the actual physical labor, but I got to get my hands dirty enough to feel like an integral part of the project. The steps were pretty basic: we pulled out and discarded all the plants that we didn't want, making sure that we got as many of their roots as possible, then we spread a layer of compost over the open soil to be worked in as we planted the new perennials. Fortuitously, the soil turned out to be better than I expected. Next we placed the plants and Sean dug the holes - same depth as the pot, but twice as wide - before he planted each new garden member carefully, being careful to loosen the root balls as appropriate and to water each one in thoroughly. The final step was to mulch.
By Sunday afternoon, here is what Sean's new pollinator garden looked like....
The plant list includes red moss phlox (Phlox subulata 'Scarlet Flame'), red bearberry (Arctostaphylas uva-ursi), cranesbill (Geranium sp.), violets (Viola sp.), lowbush blueberry (Vaccinium angustifolium), wild strawberry (Fragaria virginiana), foxglove penstemon (Penstemon digitalis), Nicky summer phlox (Phlox paniculata 'Nicky'), showy coneflower (Rudbeckia fulgida), spike blazing star (Liatris spicata), Magnus eastern purple coneflower (Echinacea purpurea 'Magnus'), wild bergamot (Monarda fistulosa), butterfly milkweed (Asclepias tuberosa), poke milkweed (Asclepias exaltata), common milkweed (Asclepias syriacus), and New England aster (Symphyotrichum novae-angliae).
The poke and common milkweed will move around; Sean will just pull out any that come up in a place that he finds displeasing. Hopefully the monarchs will eventually come to visit - and maybe even to lay eggs.
The garden is planted fairly densely; the look will hopefully be "cottage garden" in style. I'm really excited to see how it grows and matures over the next few years. Most of all, I'm looking forward to seeing the pollinators that it will be supporting. Every little bit helps!
Here is the space that we started with.....
Of course, since we're talking an area that has been built on for over a century, there was plant material already in place. Most of it was exotic, if not exotic AND invasive: black swallow-wort (a vine related to milkweed), Vinca minor, white sweet clover, crabgrass, fescue, and a cranesbill of some sort. We removed all of these except the cranesbill, which didn't seem to be invasive and which was creating a nice small carpet with a few purple flowers.
Then there were the native plants: an oak seedling, 2 maple seedlings, lots of hay fern, and and a couple violets. Pretty as the hay fern was, it was obviously too aggressive for this small an area, so we reluctantly removed it. There was still plenty of it on the north side of the house. Of course, the tree seedlings had to go, too. This is definitely not a big enough space for an oak or maple tree. We did try to keep the violets...although they got pretty mangled during the whole process.
The large shrub at the north end of the garden space is an old privet which technically belongs to the next door neighbor, so we didn't try to do anything with it. There is black swallow-wort and Boston ivy growing up in it, as well as a maple seedling or two, so Sean will have to keep a close eye on it to keep those plants from infringing on his new pollinator garden.
My biggest concern for this project was finding appropriate, non-pesticide treated, native plants to form the biological base of the new garden. Searching online, I located Garden in the Woods, a nature area run by the New England Wildflower Society. It's in Framingham, which isn't too far out of the city, and they sell native plants. We fired up the cell phone navigation system and made our way out there on Saturday morning. Woohoo! Paydirt! Even in early July, long after sensible people have put in their new gardens or renovated their old ones, Garden in the Woods still had a nice selection of Massachusetts' native plants. My only regret in going there was that we didn't have time to hike their trails.
On the way back, with Sean's car mostly full of native perennials, we stopped at Russell's Garden Center and bought a few tools, compost and mulch (plus a small butterfly milkweed). Now the car was really loaded down.
I should have taken a photo of the car, but I didn't think about it. I was too psyched about getting busy, digging in the dirt.
Luckily for me, I got to be the "consultant". Sean did the vast majority of the actual physical labor, but I got to get my hands dirty enough to feel like an integral part of the project. The steps were pretty basic: we pulled out and discarded all the plants that we didn't want, making sure that we got as many of their roots as possible, then we spread a layer of compost over the open soil to be worked in as we planted the new perennials. Fortuitously, the soil turned out to be better than I expected. Next we placed the plants and Sean dug the holes - same depth as the pot, but twice as wide - before he planted each new garden member carefully, being careful to loosen the root balls as appropriate and to water each one in thoroughly. The final step was to mulch.
By Sunday afternoon, here is what Sean's new pollinator garden looked like....
The plant list includes red moss phlox (Phlox subulata 'Scarlet Flame'), red bearberry (Arctostaphylas uva-ursi), cranesbill (Geranium sp.), violets (Viola sp.), lowbush blueberry (Vaccinium angustifolium), wild strawberry (Fragaria virginiana), foxglove penstemon (Penstemon digitalis), Nicky summer phlox (Phlox paniculata 'Nicky'), showy coneflower (Rudbeckia fulgida), spike blazing star (Liatris spicata), Magnus eastern purple coneflower (Echinacea purpurea 'Magnus'), wild bergamot (Monarda fistulosa), butterfly milkweed (Asclepias tuberosa), poke milkweed (Asclepias exaltata), common milkweed (Asclepias syriacus), and New England aster (Symphyotrichum novae-angliae).
The poke and common milkweed will move around; Sean will just pull out any that come up in a place that he finds displeasing. Hopefully the monarchs will eventually come to visit - and maybe even to lay eggs.
The garden is planted fairly densely; the look will hopefully be "cottage garden" in style. I'm really excited to see how it grows and matures over the next few years. Most of all, I'm looking forward to seeing the pollinators that it will be supporting. Every little bit helps!
Sunday, February 07, 2016
7 Pines Native Plant Nursery
One of the tough parts of moving is forging a new supporting network. I expected to have to find a new plumber, new doctor, new electrician, new grocery store, new stylist, etc. etc., but I was flummoxed after the move to realize that I needed to find a new source of native plant material and that, even worse, I had no clue where to begin.
In Kansas, I had found a fairly robust group of alternatives for acquiring native plants, including roadside collection of seeds, a few excellent individual plantspeople, Dyck Arboretum, and the occasional nursery. Here in Ft. Walton Beach, Florida, I was finding nothing but...box stores. Worse, when I looked at the plants in said box stores, they literally ALL bore the disheartening label, "We have been treated with neonicotinoid insecticides to provide a death trap for any and all insects in your garden." Okay, maybe that wasn't exactly how the label read, but that's essentially what it meant.
Searching online, I finally found mention of a native plant nursery near DeFuniak Springs, about an hour away - 7 Pines Native Plant Nursery. Last fall we made the trek up there and I was incredibly pleased by what I found. Last weekend we went back, and I am happy to report that my initial positive impression was spot on.
7 Pines is a real treat to visit. Located out in the country, north of DeFuniak Springs, I find that even the drive to get there is relaxing and enjoyable. Of course, any decline in your blood pressure due to relaxation on the drive out will be immediately counteracted by the excitement you'll feel once you turn in at the gate!
For there, gleaming in front of you, are several long, well ordered beds of native plants, carefully labeled and just calling out to go home with you. Best of all, as soon as you pull in, you will be greeted by Dara and Lloyd, the owners, who are both extremely knowledgeable and very friendly.
From common to unusual, 7 Pines has a wonderful variety of plants, reasonably priced. I won't bore you with the entire list of what I've purchased, but it was enough to make Greg groan! Best of all, the plants are healthy, well rooted, and NEONIC FREE!
Over the course of the last week, Greg and I have managed to get most of the plants we purchased into the ground, so I'm beginning to get the itch to return to 7 Pines and pick up more plants. I have a sneaking suspicion this is a trip I will be making many times in the future!
In Kansas, I had found a fairly robust group of alternatives for acquiring native plants, including roadside collection of seeds, a few excellent individual plantspeople, Dyck Arboretum, and the occasional nursery. Here in Ft. Walton Beach, Florida, I was finding nothing but...box stores. Worse, when I looked at the plants in said box stores, they literally ALL bore the disheartening label, "We have been treated with neonicotinoid insecticides to provide a death trap for any and all insects in your garden." Okay, maybe that wasn't exactly how the label read, but that's essentially what it meant.
Searching online, I finally found mention of a native plant nursery near DeFuniak Springs, about an hour away - 7 Pines Native Plant Nursery. Last fall we made the trek up there and I was incredibly pleased by what I found. Last weekend we went back, and I am happy to report that my initial positive impression was spot on.
7 Pines is a real treat to visit. Located out in the country, north of DeFuniak Springs, I find that even the drive to get there is relaxing and enjoyable. Of course, any decline in your blood pressure due to relaxation on the drive out will be immediately counteracted by the excitement you'll feel once you turn in at the gate!
For there, gleaming in front of you, are several long, well ordered beds of native plants, carefully labeled and just calling out to go home with you. Best of all, as soon as you pull in, you will be greeted by Dara and Lloyd, the owners, who are both extremely knowledgeable and very friendly.
From common to unusual, 7 Pines has a wonderful variety of plants, reasonably priced. I won't bore you with the entire list of what I've purchased, but it was enough to make Greg groan! Best of all, the plants are healthy, well rooted, and NEONIC FREE!
Over the course of the last week, Greg and I have managed to get most of the plants we purchased into the ground, so I'm beginning to get the itch to return to 7 Pines and pick up more plants. I have a sneaking suspicion this is a trip I will be making many times in the future!
Thursday, April 09, 2015
Maintenance in the Native Plant Garden
As I've given talks about utilizing native plants in our landscapes, I've become aware that many people are scared of "losing control" in their gardens by using native plants and by following organic gardening methods. So I thought folks might be interested in a blow by blow account of how I maintain my native plant landscape. I actually think that my garden chores are significantly less onerous than those of more traditional gardeners.
To start with (or, perhaps, to end with), I don't cut back my perennials in the fall or winter. Many insects overwinter in or on dead plant stems, including some of our native bees; other insect species overwinter in the leaf litter. Predators are particularly likely to be among the insects overwintering this way. The leaf litter also provides great foraging habitat for winter birds, as do the standing seedheads. Watching the birds forage and seeing the patterns of the plant stems adds winter interest to the landscape. When you add in the fact that standing vegetation holds snow (moisture) in place better than "clean" beds, you definitely have a winning winter combination for the garden.
Winter, then, is pretty basic. Enjoy the scenery!
As the plants begin to green up in the early spring, it's time to do the first chore of the year: cut back last summer's dead plant material. I consider this the main "work" in the organic, native plant garden. Otherwise, the garden takes very good care of itself. The timing of the spring cutback is always a balancing act for me. I prefer to wait long enough that there aren't many late freezes left, although that's not always possible on the prairie. Since I have planted a variety of crocus, daffodil, tulip, hyacinth, and grape hyacinth bulbs, I've started using their early blooming as my signal. Darn it - I planted them, so I want to see them!
This year my spring clean up has been particularly protracted, but that's okay. This is gardening, not a precision dance routine or an accounting balance sheet.
So that I could see the petite daffodils which had begun to bloom in the front beds, I started the spring clean up on March 18th this year. This photo was taken on the 20th, the day after we burned the front tallgrass (which you can see in the distance). All I had done so far was cut back the asters at the very front left of the photo...and, if I remember correctly, a few perennials along the sides of the path itself.
Here is a slightly different view, taken at the same time. Overall, this is what the front garden looked like for most of the winter. When I looked out the front windows, it was a rare time that I didn't see birds poking around. When we had some snow, the patterns could be stunning.
By the 26th of March, about a week later, I had cut back about half of the stems in this bed, starting at the driveway. Of course, a few more things were blooming, too, including the Callery (Bradford) pear. It always amazes me to see how quickly plants green up in the spring! Several more types of daffodils had opened, and the blue heirloom hyacinths by the driveway were putting on their annual show. (You can always click on the photos to enlarge them and see more detail.)
Just 5 days later, on the 31st, you can even see how much the daylilies right by the foundation had sprouted up. I hadn't done any more cleanup in the garden yet, though, because our kids were visiting for the last bit of March and the first week of April.
In fact, I didn't get more cleanup done until 2 days ago, when I noticed the Peach Blossom tulips in full bloom amidst the cacophony of last year's ironweed and Echinacea stems. So I did a bit more work that day....
...quitting when I'd cleared everything to the south of the little brick access path...except for the aster stems under the redbud clump. (See? I told you this wasn't a remotely frantic process!)
You can see the newly exposed Peach Blossom tulips a few feet in front of the wheelbarrow. The wheel barrow has the last load of stems for that day, which I take to the brush pile out back, while the yellow bucket holds deadheaded daffodil stems and other non-seedfilled detritus that can be put in the compost pile. Right now there is a lot more for the brush pile than for the compost pile - but that ratio changes throughout the growing season.
This morning, I finished cutting off the last of the aster stems under the redbuds and took this photo of the bed between the house and the walkway....
...and this photo of the bed between the walkway and the buffalo grass, both looking south. Although cutting back the stems took me bits and pieces of 3 weeks to accomplish, that was due to MY lack of stick-to-it-iveness, not due to this process taking any huge amount of time overall. Now that my native flower beds are established, this is the primary job that I need to do in any of these beds all year. Period. It's really pretty simple.
That said, the beds do look better if I follow up this tidying chore with some editing, which is best done at this time of year. I'll discuss that in the next post.
Oh, by the way, I found 4 Carolina (praying) mantis egg cases and 2 black and yellow garden spider egg sacs among the plant stems as I cut them back. If you look closely, you can see one of the mantid egg clusters at the base of this grass clump.
I saved the plant stalks with the egg cases on them and placed them strategically in the trimmed areas of the garden, so the young could hatch out and do their thing without further interference. Last year was obviously a good year for predators in my garden!
To start with (or, perhaps, to end with), I don't cut back my perennials in the fall or winter. Many insects overwinter in or on dead plant stems, including some of our native bees; other insect species overwinter in the leaf litter. Predators are particularly likely to be among the insects overwintering this way. The leaf litter also provides great foraging habitat for winter birds, as do the standing seedheads. Watching the birds forage and seeing the patterns of the plant stems adds winter interest to the landscape. When you add in the fact that standing vegetation holds snow (moisture) in place better than "clean" beds, you definitely have a winning winter combination for the garden.
Winter, then, is pretty basic. Enjoy the scenery!
As the plants begin to green up in the early spring, it's time to do the first chore of the year: cut back last summer's dead plant material. I consider this the main "work" in the organic, native plant garden. Otherwise, the garden takes very good care of itself. The timing of the spring cutback is always a balancing act for me. I prefer to wait long enough that there aren't many late freezes left, although that's not always possible on the prairie. Since I have planted a variety of crocus, daffodil, tulip, hyacinth, and grape hyacinth bulbs, I've started using their early blooming as my signal. Darn it - I planted them, so I want to see them!
This year my spring clean up has been particularly protracted, but that's okay. This is gardening, not a precision dance routine or an accounting balance sheet.
So that I could see the petite daffodils which had begun to bloom in the front beds, I started the spring clean up on March 18th this year. This photo was taken on the 20th, the day after we burned the front tallgrass (which you can see in the distance). All I had done so far was cut back the asters at the very front left of the photo...and, if I remember correctly, a few perennials along the sides of the path itself.
Here is a slightly different view, taken at the same time. Overall, this is what the front garden looked like for most of the winter. When I looked out the front windows, it was a rare time that I didn't see birds poking around. When we had some snow, the patterns could be stunning.
By the 26th of March, about a week later, I had cut back about half of the stems in this bed, starting at the driveway. Of course, a few more things were blooming, too, including the Callery (Bradford) pear. It always amazes me to see how quickly plants green up in the spring! Several more types of daffodils had opened, and the blue heirloom hyacinths by the driveway were putting on their annual show. (You can always click on the photos to enlarge them and see more detail.)
Just 5 days later, on the 31st, you can even see how much the daylilies right by the foundation had sprouted up. I hadn't done any more cleanup in the garden yet, though, because our kids were visiting for the last bit of March and the first week of April.
In fact, I didn't get more cleanup done until 2 days ago, when I noticed the Peach Blossom tulips in full bloom amidst the cacophony of last year's ironweed and Echinacea stems. So I did a bit more work that day....
...quitting when I'd cleared everything to the south of the little brick access path...except for the aster stems under the redbud clump. (See? I told you this wasn't a remotely frantic process!)
You can see the newly exposed Peach Blossom tulips a few feet in front of the wheelbarrow. The wheel barrow has the last load of stems for that day, which I take to the brush pile out back, while the yellow bucket holds deadheaded daffodil stems and other non-seedfilled detritus that can be put in the compost pile. Right now there is a lot more for the brush pile than for the compost pile - but that ratio changes throughout the growing season.
This morning, I finished cutting off the last of the aster stems under the redbuds and took this photo of the bed between the house and the walkway....
...and this photo of the bed between the walkway and the buffalo grass, both looking south. Although cutting back the stems took me bits and pieces of 3 weeks to accomplish, that was due to MY lack of stick-to-it-iveness, not due to this process taking any huge amount of time overall. Now that my native flower beds are established, this is the primary job that I need to do in any of these beds all year. Period. It's really pretty simple.
That said, the beds do look better if I follow up this tidying chore with some editing, which is best done at this time of year. I'll discuss that in the next post.
Oh, by the way, I found 4 Carolina (praying) mantis egg cases and 2 black and yellow garden spider egg sacs among the plant stems as I cut them back. If you look closely, you can see one of the mantid egg clusters at the base of this grass clump.
I saved the plant stalks with the egg cases on them and placed them strategically in the trimmed areas of the garden, so the young could hatch out and do their thing without further interference. Last year was obviously a good year for predators in my garden!
Thursday, March 12, 2015
Tolerating the Uglies, Take 2
Probably the hardest lesson I've learned in gardening here is to tolerate the uglies caused by blister beetles.
Our vegetable garden was one of the first gardens we began after moving in during the spring of 2007. Having just spent 6 years in southern Alabama, where tomatoes didn't grow very well, we were aching for some sweet-tart, juicy, home-grown tomatoes - and therefore tomato seedlings were some of the first plants that went in.
The tomatoes did beautifully...except that they got pretty ragged looking in late summer, in large part because of all the blister beetles - both black and gray - that were munching on their leaves. Mind you, the plants were still producing huge numbers of tomatoes. There were more tomatoes than we could possibly eat or even give away. But, doggone it, the plants looked positively decrepit, with ratty leaves, covered in blister beetle poop...er, frass. How could I call myself a gardener with my tomato plants looking this bad?
So in I rushed, intrepid organic gardener to the rescue! Every morning I would fill an old peanut butter jar half full of water with dish soap in it and sally forth to fight the blister beetles. Carefully I inspected the leaves of the tomato plants and gently picked off the blister beetles, dropping them to their soapy deaths in my peanut butter jar. At first I wore gloves, worried about the defensive chemical, cantharidin, that blister beetles are known to secrete. It's cantharidin which will cause the blisters that earn this group of beetles their family name. Eventually, though, I shed the gloves and still had no problems. It wasn't uncommon for me to pick 50 or 100 blister beetles off my tomatoes each day. Best of all, I could simply flush the dead beetles down the toilet or even put them in the compost when I was done, since my "killing agent" was simply dish soap and water.
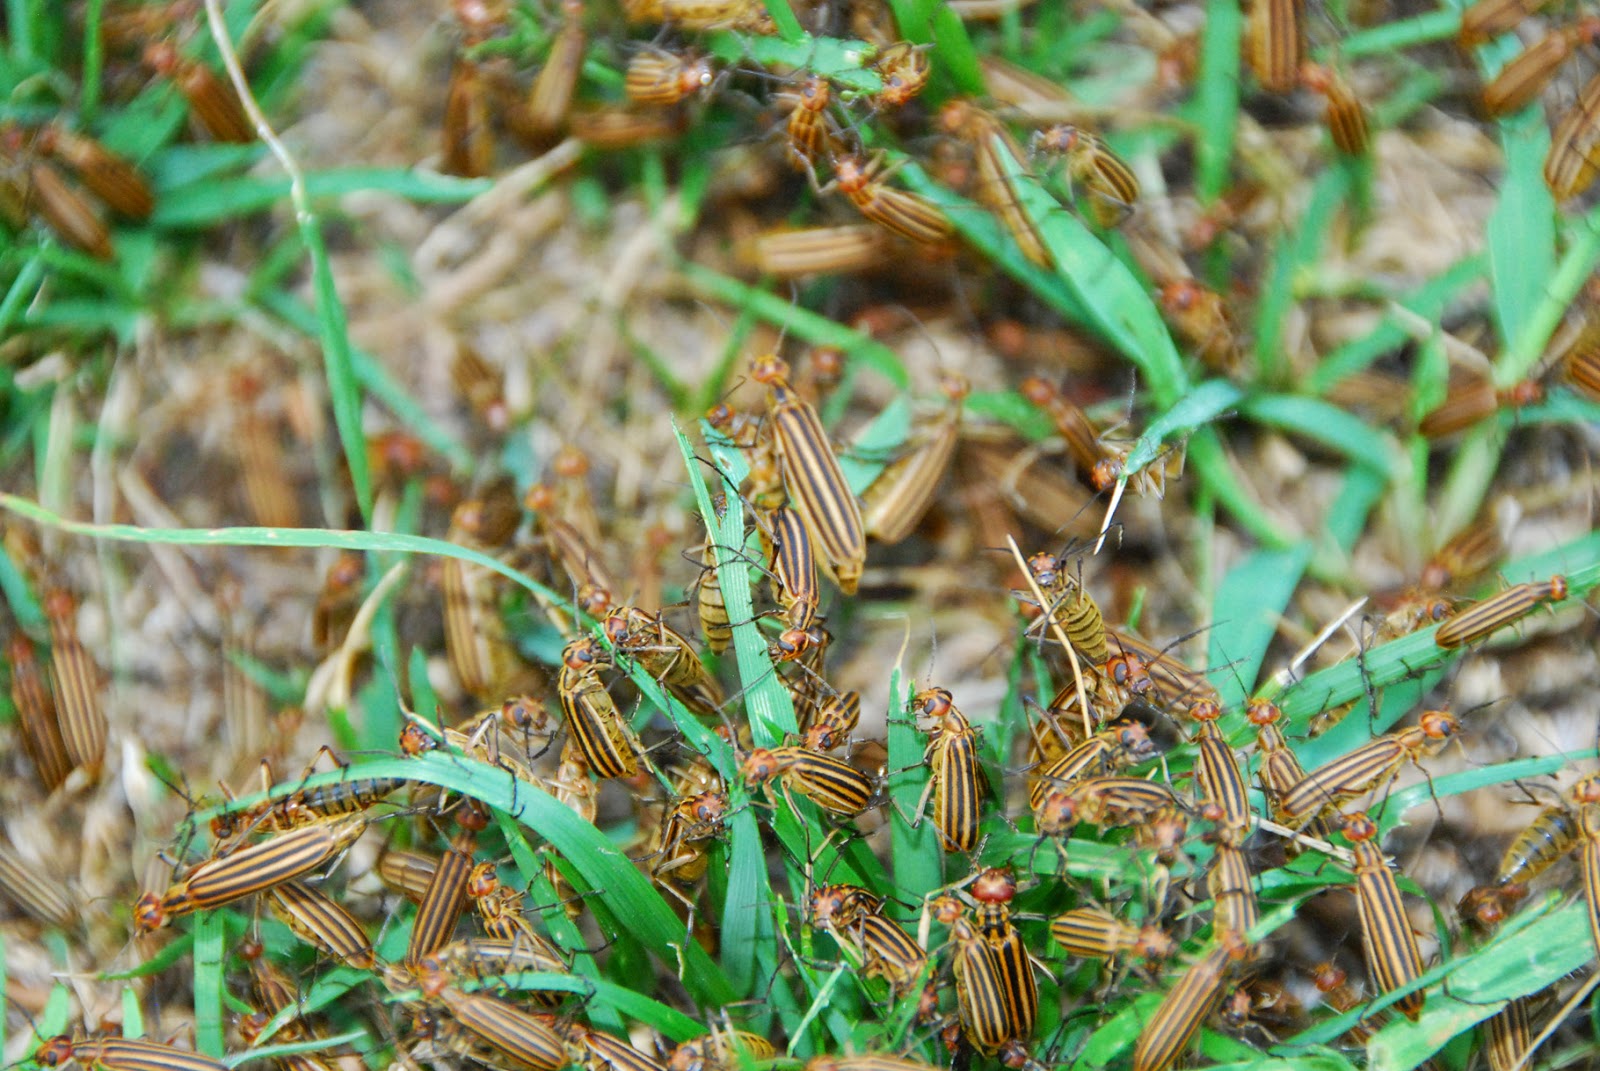
Faithfully I protected my tomato plants for several summers this way, culminating in 2011, when we came home from a trip in early June to find several huge masses of Three-Striped Blister Beetles engaged in orgies on our front lawn.
I'd not seen ONE of this blister beetle species in our yard before, let alone thousands of them. What should we do?! What if ALL of these guys started eating the plants around the yard?
Getting creative, I put my soapy water solution in a small shop vac and we vacuumed most of the striped blister beetles up. Whew. Disaster averted.
But, wait. No. Disaster NOT averted. It just wasn't the disaster I thought I was getting. Up until this point, we hadn't had any real issue with grasshopper populations, despite living in the country and being surrounded by tall grass and crop fields. Beginning in 2011 and continuing into the present, we've learned the benefit of blister beetles.
You see, blister beetle young (larvae) burrow through the soil and eat grasshopper eggs. For every adult blister beetle you see, 21-27 grasshopper eggs have NOT grown up into grasshoppers. And those 21-27 grasshoppers that haven't grown up also haven't produced any eggs or young of their own. While blister beetles eat leaves for a few weeks and make them look pretty ugly while they are munching, they don't generally eat a wide variety of plants and they don't even defoliate the ones they do lunch on. Grasshoppers, on the other hand, will eat almost anything, including bark, and they will eat it all down to nubs. The photo below shows what they did to our (shrub) althea one summer.....
Weather certainly played a role in our grasshopper outbreak, but I'm quite certain that our grasshoppers wouldn't have been as numerous if I hadn't been so zealous about controlling the blister beetle populations in our yard.
Blister beetles have now become almost a sacred animal around here. I welcome them to the yard when I see them, and I mentally encourage them to munch for a while. Happily, I've been seeing a few more blister beetles each year. I still don't see three-striped ones, though.
Meanwhile, last summer had wet spells. It turns out that, during rainy spells, grasshoppers get a fungus which causes them to climb to the top of plants, grasp the stem firmly,... and die. Our yard was full of these weird grasshopper mummies gruesomely hanging on to the tips of plants.
Between healthier blister beetle populations and grasshopper reproduction being down due to the zombie fungus last year, I'm hoping there will be fewer grasshoppers overall this summer than there have been in recent years.
I'm hoping, too, that the blister beetle populations will once again be healthy and that our tomato plants will look quite ragged by summer's end. From now on, the blister beetle "uglies" will be welcomed with open arms in our landscape!
Our vegetable garden was one of the first gardens we began after moving in during the spring of 2007. Having just spent 6 years in southern Alabama, where tomatoes didn't grow very well, we were aching for some sweet-tart, juicy, home-grown tomatoes - and therefore tomato seedlings were some of the first plants that went in.
The tomatoes did beautifully...except that they got pretty ragged looking in late summer, in large part because of all the blister beetles - both black and gray - that were munching on their leaves. Mind you, the plants were still producing huge numbers of tomatoes. There were more tomatoes than we could possibly eat or even give away. But, doggone it, the plants looked positively decrepit, with ratty leaves, covered in blister beetle poop...er, frass. How could I call myself a gardener with my tomato plants looking this bad?
So in I rushed, intrepid organic gardener to the rescue! Every morning I would fill an old peanut butter jar half full of water with dish soap in it and sally forth to fight the blister beetles. Carefully I inspected the leaves of the tomato plants and gently picked off the blister beetles, dropping them to their soapy deaths in my peanut butter jar. At first I wore gloves, worried about the defensive chemical, cantharidin, that blister beetles are known to secrete. It's cantharidin which will cause the blisters that earn this group of beetles their family name. Eventually, though, I shed the gloves and still had no problems. It wasn't uncommon for me to pick 50 or 100 blister beetles off my tomatoes each day. Best of all, I could simply flush the dead beetles down the toilet or even put them in the compost when I was done, since my "killing agent" was simply dish soap and water.
Faithfully I protected my tomato plants for several summers this way, culminating in 2011, when we came home from a trip in early June to find several huge masses of Three-Striped Blister Beetles engaged in orgies on our front lawn.
I'd not seen ONE of this blister beetle species in our yard before, let alone thousands of them. What should we do?! What if ALL of these guys started eating the plants around the yard?
Getting creative, I put my soapy water solution in a small shop vac and we vacuumed most of the striped blister beetles up. Whew. Disaster averted.
But, wait. No. Disaster NOT averted. It just wasn't the disaster I thought I was getting. Up until this point, we hadn't had any real issue with grasshopper populations, despite living in the country and being surrounded by tall grass and crop fields. Beginning in 2011 and continuing into the present, we've learned the benefit of blister beetles.
You see, blister beetle young (larvae) burrow through the soil and eat grasshopper eggs. For every adult blister beetle you see, 21-27 grasshopper eggs have NOT grown up into grasshoppers. And those 21-27 grasshoppers that haven't grown up also haven't produced any eggs or young of their own. While blister beetles eat leaves for a few weeks and make them look pretty ugly while they are munching, they don't generally eat a wide variety of plants and they don't even defoliate the ones they do lunch on. Grasshoppers, on the other hand, will eat almost anything, including bark, and they will eat it all down to nubs. The photo below shows what they did to our (shrub) althea one summer.....
Weather certainly played a role in our grasshopper outbreak, but I'm quite certain that our grasshoppers wouldn't have been as numerous if I hadn't been so zealous about controlling the blister beetle populations in our yard.
Blister beetles have now become almost a sacred animal around here. I welcome them to the yard when I see them, and I mentally encourage them to munch for a while. Happily, I've been seeing a few more blister beetles each year. I still don't see three-striped ones, though.
Meanwhile, last summer had wet spells. It turns out that, during rainy spells, grasshoppers get a fungus which causes them to climb to the top of plants, grasp the stem firmly,... and die. Our yard was full of these weird grasshopper mummies gruesomely hanging on to the tips of plants.
Between healthier blister beetle populations and grasshopper reproduction being down due to the zombie fungus last year, I'm hoping there will be fewer grasshoppers overall this summer than there have been in recent years.
I'm hoping, too, that the blister beetle populations will once again be healthy and that our tomato plants will look quite ragged by summer's end. From now on, the blister beetle "uglies" will be welcomed with open arms in our landscape!
Labels:
Blister beetles,
grasshoppers,
Organic Gardening,
Tomatoes
Subscribe to:
Posts (Atom)